
Overview
SpeedyCache introduces Abilities, a smarter way to manage your WordPress website with AI. Connect your favorite AI models (including Claude, Cursor, Antigravity, VS Code, Opencode, and Gemini) and perform everyday performance tasks using simple, natural language. You can clear and preload cache, optimize images, clean your database, review performance statistics without searching through plugin settings.
What Can Your AI Agent Do in WordPress?
Once connected, here are a few examples of tasks you can ask your AI Agent to perform:
And that's just the start. As the Abilities standard matures, we'll keep expanding what's possible.
How to Connect Your AI Agent to the MCP
The setup is located in the SpeedyCache > AI Abilities tab.First, turn on the toggle button to enable this feature. Please note that you will need WordPress 6.9 or higher, but we highly recommend updating to WordPress 7.0+ to ensure you get the full experience across all abilities.
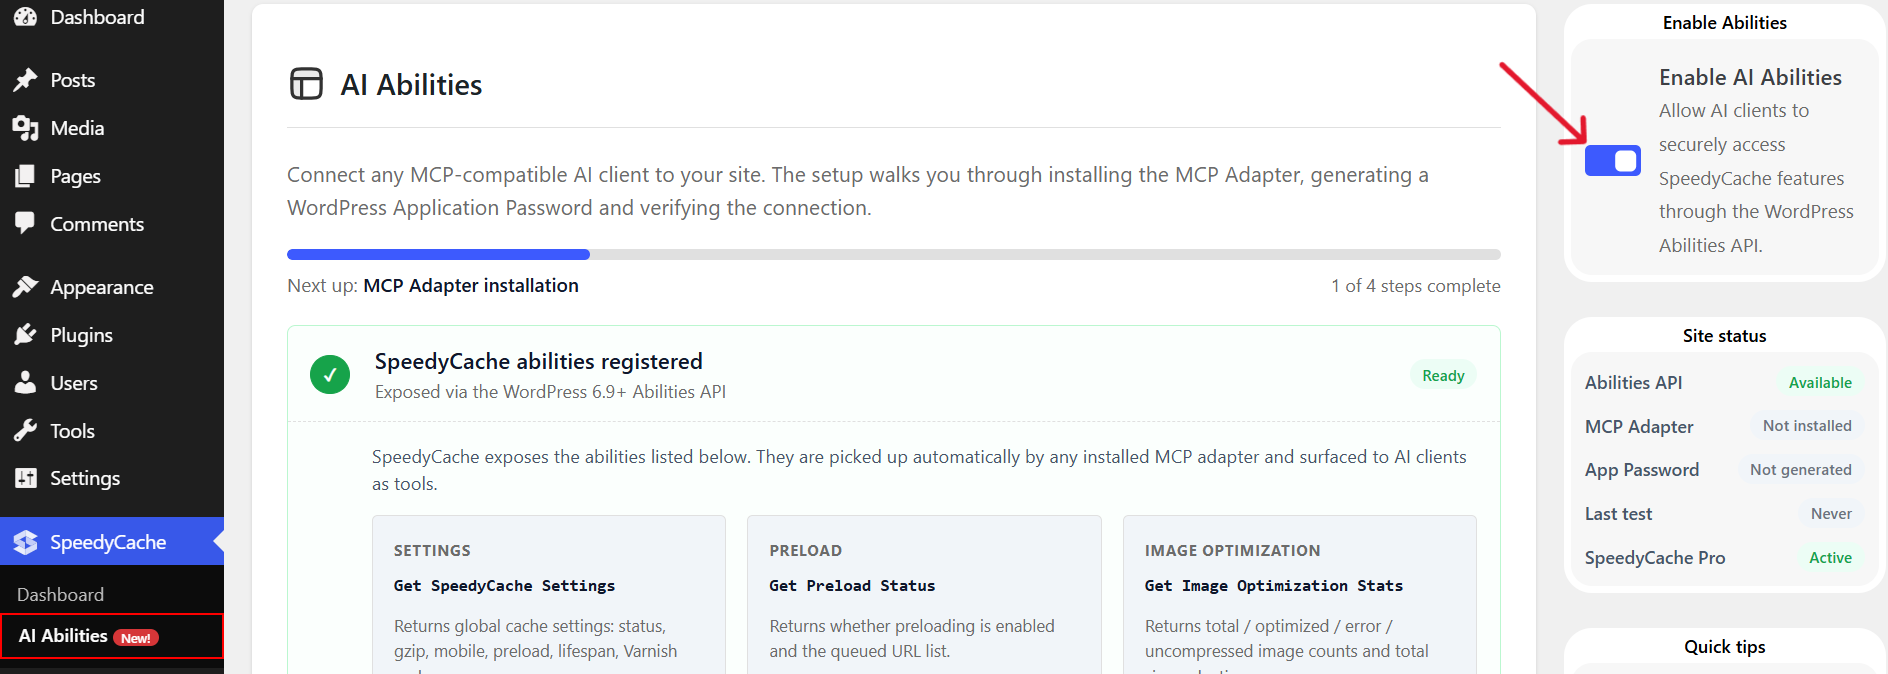
Once you're using a compatible version, Step 1 will be completed automatically. You can then complete the remaining three steps in about 2 minutes.
Step 1: Register SpeedyCache Abilities
When you open the AI Abilities section on WordPress 6.9 or higher, SpeedyCache automatically registers its Abilities with the WordPress Abilities API.
You'll see SpeedyCache Abilities registered with a green checkmark.

Here, you can browse the entire collection of SpeedyCache Abilities at a glance. We recommend reviewing this section to see all the available capabilities and understand exactly how they work.
Step 2: Install the MCP Adapter
Click Install MCP Adapter, and SpeedyCache will handle everything automatically. There's nothing you need to configure manually.
Step 3: Generate an Application Password
An Application Password provides a secure way for your AI client to authenticate with your website. Unlike your standard WordPress login password, it is a unique, dedicated credential linked directly to your user account. For added security, you maintain full control and can easily revoke this access from your WordPress profile at any time.
Click Generate Application Password. SpeedyCache creates the password and pre-fills it into the configuration snippets below.
This is what it looks like after it has been generated:
SpeedyCache automatically populates this password into the connection snippet in a later step. If you're planning to set up your AI client later, copy the password now, as WordPress hides it once the session ends.
Note: Forgot to copy your Application Password? No problem. You can always generate a new one from your WordPress Admin and revoke any previously generated passwords.
Step 4: Test the Connection
Click Test Connection. SpeedyCache will verify your Application Password and ensure your site can access the registered Abilities without any issues.
You'll see "Verified" with a confirmation that the connection is ready.
Note: Did you encounter an error during the test? Contact our support team, and we'll work with you to troubleshoot and resolve it as quickly as possible.
Setup complete! Now for the exciting part, let's see your AI Agents in action.
Let's walk through a real SpeedyCache workflow—from connecting your AI client to optimizing your WordPress website with natural language. In this guide, I'll be using "Antigravity", but you can follow the same steps with any supported AI client.
Connection Antigravity: A Full Walkthrough
Once you've completed the four steps above, follow these instructions to connect Antigravity to your website. The setup process is virtually identical for other supported AI clients. Simply select your preferred client from the "Connect to AI Client" section and follow the corresponding instructions.
Step 1: Copy the Command Snippet
Scroll down to the Connect to AI client section and select the Antigravity tab.
You'll see a configuration snippet with your Site URL and Application password already filled in, assuming you're in the same session in which you generated it. if not, you can always swap in the new password.
Click the "Copy" Button in the top-right corner of the code block to copy the configuration snippet.
Step 2: Update the Configuration File
Open your terminal and access the ~/.gemini/config/mcp_config.json configuration file.
Press Enterto open the file in the nano editor, then paste your copied snippet into the file.
To save your changes and exit, follow these quick shortcut:
Step 3: Start a New Session
Type 'exit', press Enter, and start a new Antigravity session. GoSMTP Abilities will load automatically when the new session begins.
Tip: You can ask your AI client to list the SpeedyCache Abilities at any time. This gives you a clear overview of all the WordPress performance and caching tasks you can perform with the AI agent. You can also ask it to explain an ability to help you understand how it works.
Step 4: Type a Command
You're connected! Now you can start asking Antigravityto manage, optimize and your WordPress website with SpeedyCache.
Let's look at a practical example. I'm going to ask Antigravity to delete all cached files from my WordPress website so you can see how an AI agent can perform cache management tasks on your behalf.
All cached files are purged in real-time. Here is where the SpeedyCache MCP shows its power—with a single prompt using the speedycache-cache/delete-all ability, you can instantly clear your entire site cache, minified assets, and Gravatars without ever opening the WordPress dashboard.
I've got to say, this is one of the most exciting features we've introduced to the plugin so far. AI is already a part of how most of us work every day, and this simply brings that same workflow directly into your WordPress site performance and cache management. As shown in the images above, you can easily verify successful cache purging across page caches, minified assets, fonts, and Gravatars.
SpeedyCache AI Abilities are now active. The connection has been fully established, and your AI agent is ready to work. You can now issue direct commands to manage your WordPress cache and performance workloads.
If you face any issues configuration your AI agent with GoSMTP, You can Contact our support team.